I originally wrote the prize-winning Interop Forms article below for code project. The prize, an XBox 360 Elite system, was pretty sweet. Even sweeter, however, was the nod I received from the Microsoft VB Team here: http://blogs.msdn.com/vbteam/archive/2007/06/01/so-what-does-lt-comclass-gt-actually-do.aspx and here: http://blogs.msdn.com/vbteam/archive/2007/06/04/interopforms-2-0-tip-1-font-property.aspx.
The feedback from the VB Team, along with some help from Mike Dooney, led me along the right path to rework my C# templates a bit (the toolkit comes with only VB.NET templates). The differences between the VB and C# templates highlight the fact that although the two languages are often believed to do the same thing once code is compiled to IL, this is not really the case, and in fact, when it comes to COM, VB does a much better job.
To be specific, the VB compiler creates additional code in IL to make a VB class’s events and properties visible in VB6, while the C# compiler does not. I had written the original templates with the assumption that the two compilers would write similar IL — because of this faulty assumption, the events thrown in a C# UserControl were never received in VB6. This has been corrected in the updated C# templates by including in C# the extra attributes and interfaces required to make the events visible — interfaces which the VB compiler automatically creates for you in IL.
The C# templates linked below also automatically create these interfaces for you. When you add a new event to your UserControl, you will just need to be sure to add it to the appropriate interface, as well. The naming convention for the interfaces (one for exposed events, one for exposed properties) is simply the name of the UserControl class preceded by two underscores and one underscore, respectively. It’s a little bit more manual labor than the VB templates require — but not too much more.
From the feedback I received at code project, it is apparent that while the toolkit is a big help to developers still maintaining VB6 applications, the big gain is for FoxPro developers (really a very solid development framework) who can now squeeze a little more out of their interfaces when they need to, thanks to the Toolkit.
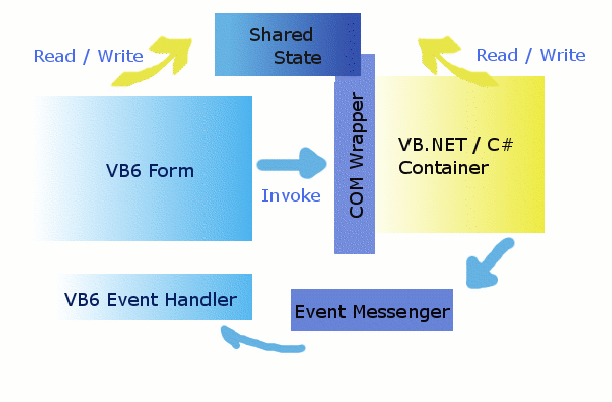
Why use the Interop Toolkit?
A few years ago, the enterprise architects at the company I worked for came up with a central login mechanism for all the company’s applications using web services. They even provided code samples in Java, C# and VB.NET for using their new component. It was intended as a language agnostic solution. When we asked the architects what we should do with the VB6 applications that we were still supporting, the architects were nonplussed. They first provided some esoteric white papers on using SOAP with VB6, then they suggested that we upgrade all of our VB6 apps to .NET, and finally they conceded that VB6 apps simply didn’t have a place in their solution.
Had Interop Forms Toolkit 2.0 been available back then, we could have come up with an integration in under an hour. We would have simply copied the sample code into a new .NET User Control, used the Interop Toolkit to wrap it up as an ActiveX control, and then consumed the control in all of our VB6 apps.
Interop Toolkit 2.0 was just released at the beginning of May. The original Interop Toolkit already allowed VB developers to use .NET Forms in their applications. This is still in Toolkit 2.0, and appears not to have changed much.
What makes Toolkit 2.0 standout is its support for using .NET User Controls as ActiveX controls in VB6.
According to Microsoft, the toolkit is intended as part of a migration strategy for upgrading VB6 applications to .NET piece by piece. I am not sure this is how it is likely to be used, however, or even if it necessarily ought to be used in this way.
Toolkit 2.0 makes most sense as a tool that allows VB6 developers to take advantage of .NET features without being forced onto an upgrade path. Most VB6 applications that are still around obviously meet certain needs very well. Why fix something that isn’t broken?
There are times, however, when you may want to leverage .NET features in your VB6 application. For a long time your only two choices were to upgrade the whole application to .NET, or to forego the nifty new features.
Toolkit 2.0 provides a third option. Simply add the .NET feature you need as a control.
This tutorial will lead you through 1. a mock application that implements the sort of technology we would have used to solve the problem outlined above. It will also cover 2. installing the Interop Toolkit, 3. provide a reference app that gives developers the ability to use real multithreading in their VB6 apps, and finally 4. provide a how-to for integrating XAML files into VB6.
Interop for C# developers
Just as with the previous version, Interop Forms Toolkit 2.0 is geared towards VB.NET developers. The wizard, project templates and item templates that come with the Toolkit only come in VB flavors. This makes a certain amount of sense, since it will mostly be VB developers who will implement these .NET/VB6 integrations. Many developers like to work with both languages, however, and there may be integration scenarios where you need to expose pre-existing C# code to VB6.
For those cases, I’ve written the C# item template and C# project template linked above for Interop User Controls. Simply copy the project template zip file into your project templates folder (the default location is ...\My Documents\Visual Studio 2005\Templates\ProjectTemplates\Visual C#) and the item template zip file into your item templates folder (...\My Documents\Visual Studio 2005\Templates\ItemTemplates\Visual C#). I believe that these templates will only work with Visual Studio 2005, but I havn’t yet tested on older versions of Visual Studio to make sure.
For cases where you need to expose a C# Form, you can use the clever wizard and template written by Leon Langleyben, which I was able to get to work with a bit of tweaking — through no fault of Leon’s, since his add-in was written for the previous version of the Interop Toolkit (refer to the CSXamlEmbeddedForm project in the included CSharp Samples to see what the generated wrapper class should look like in C#).
Installing the Toolkit
Installing the toolkit is fairly straightforward. Navigate to the Toolkit Download Site and, of the three downloads available, run the InteropFormsInstaller.msi file. In most cases, this is all you need to do. When you open the Visual Studio.NET IDE, you should find the new templates, VB6 Interop UserControl and VB6 Interop Form Library, available when you create a new VB.NET project. Under your tools menu, you should also find a new wizard labeled “Generate InteropForm Wrapper Classes”.
If the new wizard does not appear in your tools menu, there may have been a problem installing it. Check Tools | Add-in Manager to make sure that this wizard is selected. If it is present and selected in the Add-in Manager, but still does not appear in your tools menu, you can run the following command in your command line to reset it: Devenv /resetaddin Microsoft.InteropFormTools.InteropFormProxyGenerator.Connect.
Installing the Toolkit on Vista
In order to use the Toolkit on Windows Vista, you will need to download both the msi file as well as the setup file to your harddrive. Then run setup. Running the msi file alone will generate an install error.
To use the C# UserControl templates on Vista, you will need to run Visual Studio as an Administrator. Right-click on the link to your Visual Studio IDE and select the Run as administrator popup menu option. This will let Vista’s UAC feature know that it is alright for the UserControl to write to the registry on build events.
Building a User Control
In this first example, the UserControl will take care of all the processing, and will just sit in the VB6 Form, while the example following it will demonstrate how to pass information between VB6 and VB.NET. Any code snippets will be in VB, though the source code samples linked above include both a VB.NET as well as a C# sample of the control.
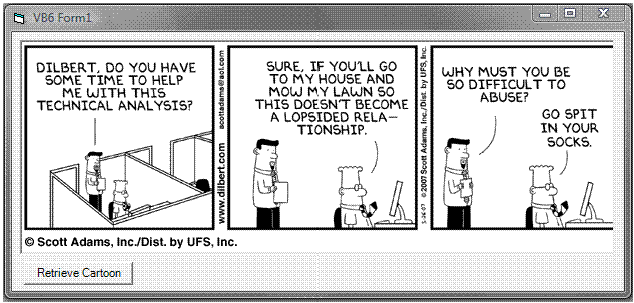
In this example we use the Daily Dilbert web service to download a cartoon to our control (you will notice that the Daily Dilbert comes up a lot on CodeProject — for good reason; it happens to be one of the few interesting web services that can actually be used in public tutorials, since it does not require a fee or registration).
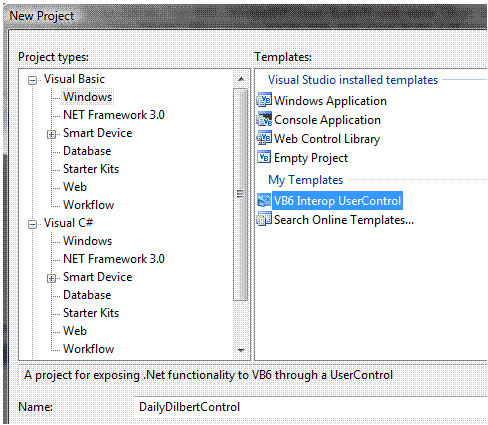
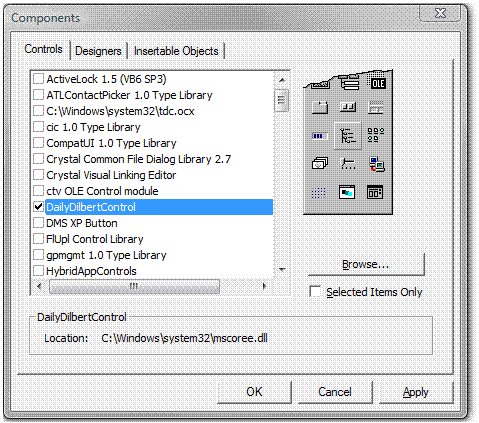
Begin by creating a new VB6 Interop User Control project using the VB6 Interop UserControl project template. Name the project DailyDilbertControl. By default, a UserControl file is created called InteropUserControl.vb. Since this is the control name that will be displayed in your VB6 control panel, you should rename it to DilbertService.vb, to be more descriptive.
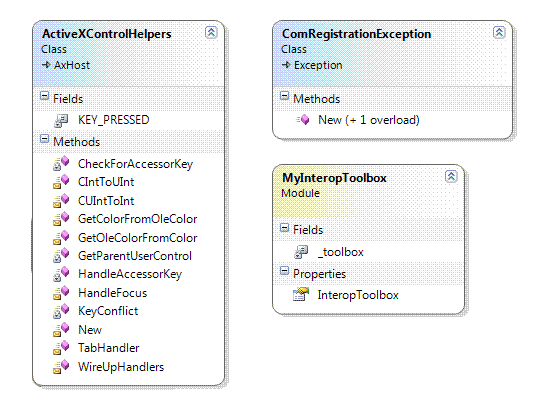
In your new project, you will find the following files: ActiveXControlHelpers.vb, InteropUserControl.bmp, InteropUserControl.manifest. ActiveXControlHelpers.vb, as the name suggests, includes several static helper methods that make the conversion of your UserControl into an ActiveX control possible. There are register and unregister methods, which add details about your control to the registry. There are methods that help convert things like color codes between the .NET scheme and the OLE scheme used in VB6. There is also a method that wires up your events to work with VB6. You can have multiple user controls in your project, but should only have one ActiveXControlHelpers file per project.
The InteropUserControl.bmp is used to display your control in the VB6 Toolbox. I will cover how to customize your ActiveX control image later in this tutorial.
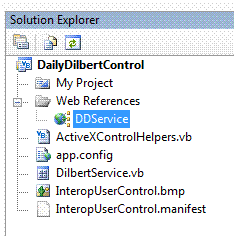
Add a new web reference to the Daily Dilbert web service to your project. To do this, right click on your project and select Add Web Reference… A new dialog will pop up. Enter http://www.esynaps.com/WebServices/DailyDiblert.asmx for the URL and click on Go. Finally, rename the web reference to “DDService” and select Add Reference at the lower right of the dialog. Your Solution Explorer should now look like this.
Add a 650 by 215 pixel PictureBox called DilbertPictureBox to your UserControl, as well as a button called RetrieveButton. Create a new RetrieveButton_Click event handler by double clicking on RetrieveButton. Paste in the following code, which will call the web service and retrieve today’s Dilbert strip.
    Private Sub RetrieveButton_Click(ByVal sender As System.Object, _
        ByVal e As System.EventArgs) Handles RetrieveButton.Click
        Dim myDilbert As New DDService.DailyDilbert()
        Dim DilbertMemoryStream As _
        New System.IO.MemoryStream(myDilbert.DailyDilbertImage())
        With Me.DilbertPictureBox
            .Image = Image.FromStream(DilbertMemoryStream)
            .BorderStyle = BorderStyle.Fixed3D
        End With
    End Sub
To finish making your control visible from VB6, just press F5 to preview the control, or simply build it. It will look like this in your Visual Studio UserControl Test Container:
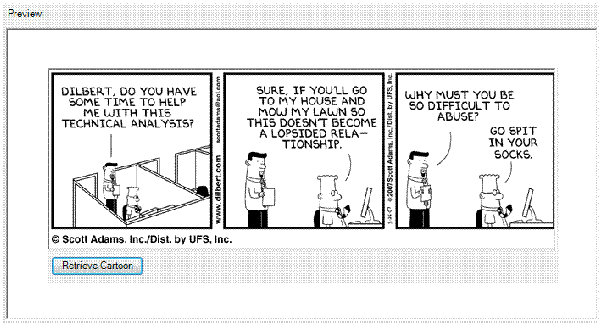
And that’s all it takes to build build an ActiveX control in Visual Studio.NET.
Adding an ActiveX Control Image
When you build a new control, InteropUserControl.bmp will be used as the default image for your component in the VB6 Toolbar. You can always use a different image, though. For this project, I want to use this image of Dilbert.

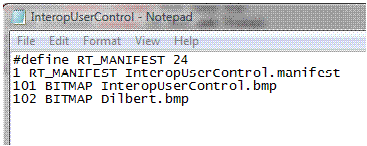
To add it, you first have to add the bitmap file you want to use to your project and set its build property to “content”. Now open the InteropUserControl.rc resource script file with notepad. DO NOT use Visual Studio to do this, as this will mess up your resource script file. InteropUserControl.rc can be found under the DailyDilbertControl project folder. Beneath the default 101 BITMAP InteropUserControl.bmp entry, add an additional entry specifying the custom bitmap you want to use.
Save your resource script file. Now open ActiveXHelpers.vb and find the RegisterControl method. This is where registry entries are created. In the section where the bitmap file is specified, replace the default entry, “101”, with a reference to your own bitmap.
Now rebuild your control to make sure a new compiled resource file is created. The new image should appear in the VB6 Toolbox rather than the default image.
More about adding ActiveX Control Images
You can use a different image for each UserControl in your project, but you will have to modify the ActiveXControlHelpers.vb file a bit to make this work. Alter the RegisterControl method signature to take a second string parameter, and then pass this parameter to the line where the code specifies the resource id of the image.
Public Sub RegisterControl(ByVal t As Type, ByVal BitmapId As String)
'...
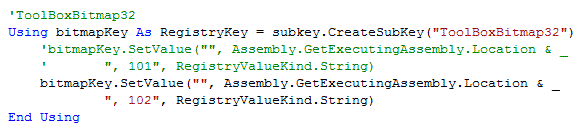
'ToolBoxBitmap32
Using bitmapKey As RegistryKey = subkey.CreateSubKey("ToolBoxBitmap32")
bitmapKey.SetValue("", Assembly.GetExecutingAssembly.Location & ", " _
& BitmapId, RegistryValueKind.String)
End Using
'...
End Sub
Then, in each UserControl, add the BitmapId you want to use for your control to the RegisterControl call.
    <EditorBrowsable(EditorBrowsableState.Never)> _
    <ComRegisterFunction()> _
    Private Shared Sub Register(ByVal t As Type)
        ComRegistration.RegisterControl(t, "102")
    End Sub
Rebuild the entire project once more.
Adding the UserControl to a VB6 project
This is actually the easiest part. Create a new VB6 project. Press CTRL+T to add a new component to your form, and check the DailyDilbertControl library. Press OK. (Vista behaves a bit strangely when you try to add your ActiveX control. It will occassionally throw an error the first time you select OK, then will work normally the second time you do so. Just to be safe, click Apply first just to see if there is an error, and then OK.) Any UserControls in your project will now appear on the VB Toolbar. Simply select the control you want to use and draw it onto your VB6 form. Press F5 to see your .NET UserControl run in a Visual Basic 6 application.
Adding True Multithreading to VB6
When I was working with VB6 on a regular basis, one of the main impetuses for upgrading to .NET was the ability to implement multithreading. Interop UserControls provide an easy way to add true multithreading to a VB6 application. In a common scenario, you may want the users of your VB app to be able to kick off a process and then continue with their work while the processing occurs in the background. To simulate this scenario, the reference code we are about to build will use a BackgroundWorker control that will perform a time-consuming process in the background while updating a progress bar. In the meantime, the users of the VB6 application that consumes the control can continue with their work.
Create a new VB6 Interop UserControl project called MultithreadedControl. Add a BackgroundWorker control named BackgroundWorker1, a label called LabelWarningMessage and ProgressBar called ProgressBar1. Paste in the following code.
    Public Delegate Sub StartEventHandler(ByVal simpleEventText As String)
    Public Delegate Sub FinishAsyncEventHandler(ByVal asyncEventText As String)

    Public Event StartEvent As StartEventHandler
    Public Event FinishAsyncEvent As FinishAsyncEventHandler

    Public Sub StartProcessing()
        Try
            RaiseEvent StartEvent(".NET process starting")
            Me.BackgroundWorker1.RunWorkerAsync()
        Catch
        End Try
    End Sub

    Private Sub BackgroundWorker1_DoWork(ByVal sender As System.Object, _
    ByVal e As System.ComponentModel.DoWorkEventArgs) _
    Handles BackgroundWorker1.DoWork
        'wait
        Static prog As Integer = 0
        While (prog < 100)
            System.Threading.Thread.Sleep(50)
            prog = prog + 2
            Me.BackgroundWorker1.ReportProgress(prog)
        End While
        prog = 0
    End Sub

    Private Sub BackgroundWorker1_ProgressChanged(ByVal sender As System.Object, _
    ByVal e As System.ComponentModel.ProgressChangedEventArgs) _
    Handles BackgroundWorker1.ProgressChanged
        Me.LabelWarningMessage.ForegroundColor = Color.Red
        Me.LabelWarningMessage.Text = "Working in background..."
        Me.LabelWarningMessage.Visible = True
        Me.ProgressBar1.Value = e.ProgressPercentage
    End Sub

    Private Sub BackgroundWorker1_RunWorkerCompleted(ByVal sender As System.Object, _
    ByVal e As System.ComponentModel.RunWorkerCompletedEventArgs) _
    Handles BackgroundWorker1.RunWorkerCompleted
        Me.LabelWarningMessage.Visible = False
        RaiseEvent FinishAsyncEvent("Interop User Control process finished.")
    End Sub

    Private Sub BackgroundWorker_Load(ByVal sender As System.Object, _
    ByVal e As System.EventArgs) Handles MyBase.Load
        Me.ProgressBar1.Value = 0
        Me.LabelWarningMessage.Visible = False
    End Sub
Finally, make sure that the BackgroundWorker events are hooked up to the handlers we’ve written.
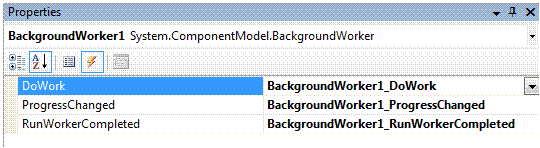
Also make certain that the BackgroundWorker’s WorkerReportsProgress property is set to true. Build the project.
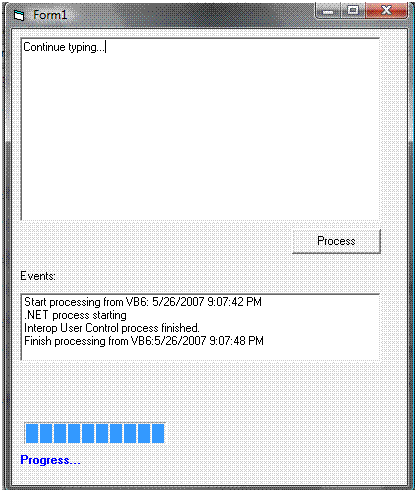
Open a new VB6 project and add the MultithreadedControl component to your VB6 Form, as you did in the previous example. Also add a multiline TextBox control (Text1), a ListBox (List1), and a CommandButton labeled “Process” (Command1).
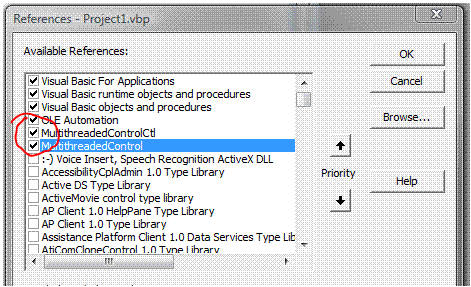
In order to receive events from the BackgroundWorker control, you will need to add an additional reference to the control. Click on the menu item Project | References… A reference to MultithreadedControlCtrl will already be checked off from previously adding it as a component. You will now need to also include a reference to the library MultithreadedControl in order to capture events thrown from the .NET Control.
Finally, paste in the following VB6 code. In this code, you declare a new reference to the control, this time decorated with the keyword “WithEvents” in order to expose the control’s events. Wiring up handlers for the events is based only on the names of the procedures, so you have to be careful when typing out the Sub routines that will be used in this way.
Before the underscore, always use the same name you used when you created the second reference (in this case “BackgroundEvents”). Then after the underscore, use the actual event name as it appears in your original .NET control. I’ve seen lots of problems posted to various message boards concerning problems with VB Interop event handling that basically came down to misspelling a handler’s signature — so be careful.
Dim WithEvents BackgroundEvents As MultithreadedControl.BackgroundWorker

Private Sub Command1_Click()
    Me.Text1.Text = ""
    Me.List1.Clear
    Me.List1.AddItem ("Start processing from VB6: " & DateTime.Now)
    Me.BackgroundWorker1.StartProcessing
End Sub

Private Sub Form_Load()
    Set BackgroundEvents = Me.BackgroundWorker1
End Sub

Private Sub BackgroundEvents_StartEvent(ByVal EventText As String)
    Me.List1.AddItem (EventText)
End Sub

Private Sub BackgroundEvents_FinishAsyncEvent(ByVal EventText As String)
    Me.List1.AddItem (EventText)
    Me.List1.AddItem ("Finish processing from VB6:" & DateTime.Now)
End Sub
This reference app basically demonstrates how a .NET BackgroundWorker can be used inside a VB6 application. Even while the processing is occurring, and updating the status bar to let us know how far it has gotten, the end-user can continue typing into the textbox. If you have never programmed in VB6, then this probably seems like a trivial accomplishment.
For those of us who have worked on Visual Basic 6 apps for large portions of our careers, it is a breakthrough.
Using XAML in VB6
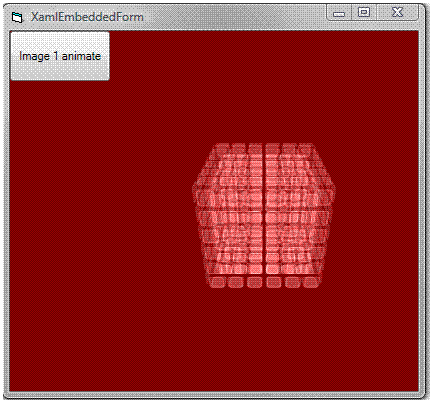
You cannot build a XAML UserControl or a XAML Form and then consume it directly in VB6, unfortunately. You also cannot simply add a XAML Form to a Windows Application project and expose it that way. With a bit of finesse, what you can do is embed a XAML UserControl in a Windows Form and consume that in your VB6 apps. The following walkthrough will show you how.
Create a new VB6 InteropForm Library Project in Visual Studio, and call it XamlEmbeddedForm. Rename the default Windows Form to XamlForm. Now add a second project based on the .NET Framework 3.0 Custom Control Library (WPF) project template and call it XamlUserControl. You can add whatever XAML code you like, at this point. For the reference project, I’ve used the Cube Animation code found in the WPF SDK. Build the XamlUserControl project. In XamlEmbeddedForm, add a reference to the UserControl project. Also add the following four library references: PresentationCore, PresentationFramework, WindowsBase and WindowsFormsIntegration.
You now will need to add some code to the FormLoad event in order to host the XAML UserControl in your .NET Form. The complete code behind should look like this:
Imports Microsoft.InteropFormTools
Imports System.Windows.Forms.Integration
Imports System.ComponentModel
Imports System.Windows.Forms

<InteropForm()> _
Public Class XamlForm

    Private Sub XamlForm_Load(ByVal sender As System.Object, _
        ByVal e As System.EventArgs) _
        Handles MyBase.Load
        ' Create the ElementHost control for hosting the
        ' WPF UserControl.
        Dim host As New ElementHost()
        host.Dock = DockStyle.Fill

        ' Create the WPF UserControl.
        Dim uc As New XamlUserControl.UserControl1()

        ' Assign the WPF UserControl to the ElementHost
        '  control's Child property.
        host.Child = uc

        ' Add the ElementHost control to the form's
        ' collection of child controls.
        Me.Controls.Add(host)
    End Sub
End Class
Rebuild your solution one more time for good measure. Then go to the Tools menu and select Generate InteropForm Wrapper Classes (if this menu option is missing, refer to the installation instructions above). This will add a new wrapper class to your project that can be exposed to VB6. Rebuild one last time to register your wrapper class in the registry. At this point, your .NET code is complete.
Open a new project in VB6. Open Project | References and check two items to add them to your VB6 project: Microsoft Interop Forms Toolkit Library as well as your .NET project, XAMLEmbeddedForm to add to COM wrapper for your .NET assembly to your VB6 project.
.NET Interop Forms have difficulty knowing when the host VB6 application starts and stops, so some extra code must be added to your VB6 application to handle this. Add the following code snippet to your VB6 Main Form so the .NET code is informed when these events occur.
Public g_InteropToolbox As InteropToolbox

Private Sub Form_Load()
    Set g_InteropToolbox = New InteropToolbox
    g_InteropToolbox.Initialize
    g_InteropToolbox.EventMessenger.RaiseApplicationStartedupEvent
End Sub

Private Sub Form_QueryUnload(Cancel As Integer, UnloadMode As Integer)
    g_InteropToolbox.EventMessenger.RaiseApplicationShutdownEvent
End Sub
We are nearly done. To open your .NET Form from VB6, just add a command button to your Main Form and handle its click event with the following code.
Private Sub Command1_Click()
Dim xaml As New XamlEmbeddedForm.XamlForm
    xaml.Show vbModal
End Sub
If everything goes right, when you click the button, you should see an animated cube, written all in XAML.
Conclusion
This tutorial is intended to walk you through the steps needed to create a useful .NET/VB6 integration. It is also intended to give you a sense of the almost limitless possibilities that are open to VB6 developers now that this technology has been made widely available. Half a decade after people were foretelling the doom of VB6 as a development tool, we should come to terms with the idea that VB6 will still be with us for quite a while longer. Interop Toolkit 2.0 ensures that the many years left to VB6 development will be both graceful and productive.